Getting Started on Tapas
Creating a NOVEL episode
Step by step tutorial
Creating a webnovel is hard work, so we've made uploading episodes as simple and convenient as possible! We offer a variety of features, including scheduling for a later release date, adding images, pinning comments and more!
Step 2: Schedule Date
For each episode, you can choose to either publish it now or use our scheduling feature to set up a time and date for it to be published automatically.
Select Now if you want an episode to be released right away.
If you want to schedule the release of your episode on a specific time and date, click the Schedule option and select your preferred time and date. Press Schedule when finished.
(Scheduling requires a minimum of 5 minutes in advance of posting.)

Step 3: Add Story
Enter your episode’s story. Tapas allows your episodes to be up to 15,000 characters. Using our text editor, you can modify your text. Please ensure your story follows our Content Guidelines!
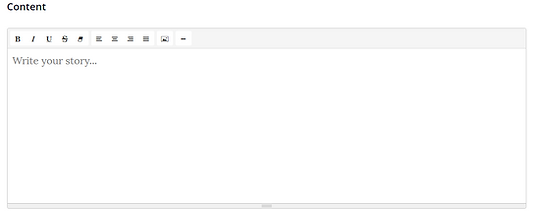
Per episode, you can upload up to 5 images, each up to 2MB in size. Click the Image icon and select a file to upload. You can float your image either left, right, or center. Press the trash bin to remove the image.

Step 4: Add Thumbnail
Thumbnail:
Add a thumbnail for your episode, which will show up in your episode list and help your readers distinguish the different episodes visually. Most creators use a snippet of artwork from that episode, others like to reuse the same artwork for multiple episodes. This artwork must be safe for all ages, and shouldn’t contain nudity or suggestive art.
Thumbnail: 300 x 300 px, PNG, JPG or GIF, Under 2 MB
Share Thumbnail:
When sharing individual episode links on social media, a share thumbnail will appear along with your link.

Step 5: Add a Description (Optional)
You can also add a description, which will appear in your Author’s Comments section under your published episode. You can use this area to start a conversation with your readers, ask a question or share what’s on your mind! This is optional and you can leave it blank.

Step 6: Mature Content and Comments
Mature Content:
If your episode contains mature themes, you must mark the episode as Mature and select the appropriate tags (more than one can be selected at a time). Content with sexual themes, nudity, abuse or violence, as well as gore and blood should always use a mature filter. Please use responsible judgement when tagging your episode and include tags for all themes that can be potentially triggering to readers. If you would like to see more details, please visit our Content Guidelines.

Comments:
By default, episodes are open for comments. Most creators leave their comments on, but you can choose to turn off comments through this toggle. Alternatively, you can also delete individual comments from your series.
Step 7: Tags
Episode Tags:
You may add up to 10 tags to your episode. Hit enter after each tag to add them and hit the X to remove them.
These tags will appear underneath your Author’s notes box, have no search functionality, and are therefore often used by creators to share some additional information with their readers.

Step 8: Preview
Before publishing your episode, you can preview how it will look on desktop and mobile devices by clicking the preview button in the top right corner. It will open your episode in a new window and will allow you to review your work. It is recommended to ensure that your comic’s font is legible on both mobile and desktop, as many readers use our app!
Step 9: Draft, Schedule, or Publish
Draft
Episodes are automatically saved as drafts. After making changes to your episode, please wait a few seconds before leaving the page. If you see the "Draft Saved" message in the top right corner, your draft has been saved. You can access drafts in the Episodes tab on the Dashboard.
Schedule or Publish
Depending on if you scheduled your episode or not, you will either see the Publish button or Schedule button. Simply click either button! Publish will release your episode now. Schedule will release your episode at the time you selected in Step 2 of this guide.
After Publishing Your Episode
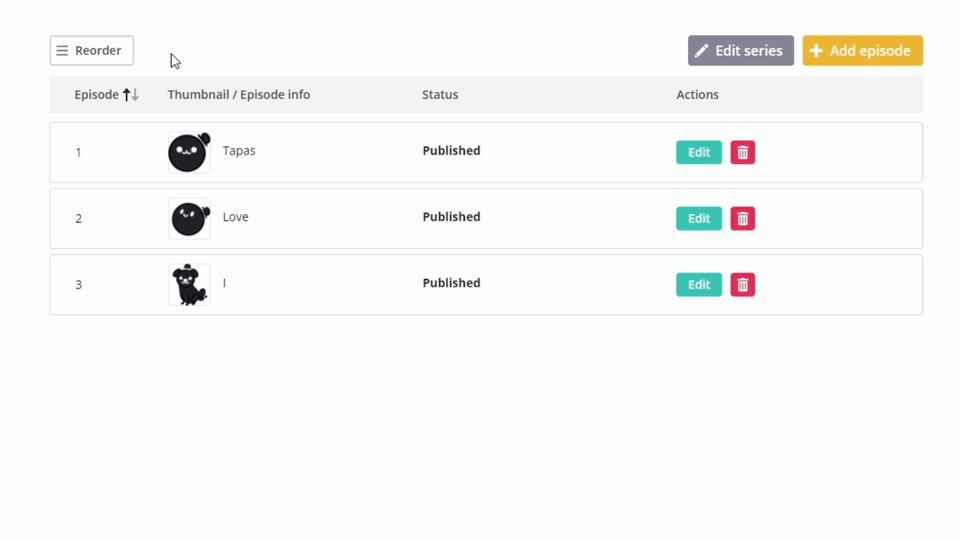
You can continue to edit an episode even after it's published by clicking the Episodes tab on the Dashboard.
You can also reorder episodes by clicking the Reorder button as shown below:
When you receive comments on an episode, a Comment button will appear in the Episodes tab.
Click it to open a popup window which will allow you to scroll through all comments and also filter by “Unanswered comments” (Comments without creator responses).
You can pin your favorite comment by pressing the Pin icon! A pinned comment will appear first on the desktop and app comment section, giving you the option to to celebrate your favorite response to your episode. If you do not pin a comment, comments will stay in the default order.

Want to learn more?
Check out our other tutorials for new creators!


